Step-by-step overview on how to deploy Vetted Security Solutions’ trailer with automated license plate recognition (ALPR) system.
STEP 1
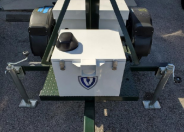
Start by deploying all four legs on the Trailer. This is necessary to avoid tipping the Trailer. The ALPR Enclosure is the box on the front of the Trailer with the Vetted logo sticker on the front
STEP 2
Open the ALPR Enclosure. The Gas Shock on the left hand side will keep the lid open while the Trailer is being deployed. There are two sections inside the ALPR Enclosure

STEP 3
The computer portion of the ALPR Enclosure will come in the off position before deployment. The ALPR section of the Trailer and the Message Board section are running separately. This means the Message Board can still be used even if the ALPR is off, and vise versa.
• Computer portion (Red)
• Monitor/keyboard slide (Yellow) VETTED SECURITY SOLUTIONS DESIGN STEP
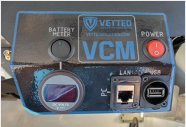
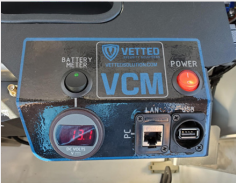
STEP 4
To turn the ALPR Enclosure on, you will set the “Power” switch in the “I” or “on” position. To check the Voltage of the Trailer, you will set the “Battery Meter” switch to the “on” position (green LED pushed down). The battery meter allows you to monitor the voltage levels of the Trailer.
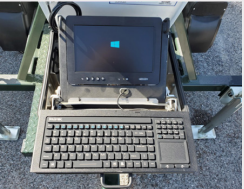
STEP 5
Once you have powered the ALPR Enclosure on, pull the large handle attached to the keyboard.
- The Monitor can be pushed back to adjust the viewing angle and keyboard position.
- The Monitor is set to go into sleep mode after a 15 minute delay.
STEP 6
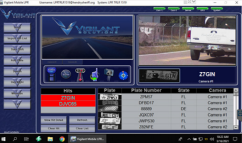
There are a few programs that are automatically set to open once the PC has been booted up. These programs include:
- Vigilant Mobile LPR
- TeamViewer
- Core Temp (Yellow number in the notifications bar)
Vigilant will take a few minutes to completely boot up. You may notice the “bubbles” in the top right of the window are red during this time. Once all five are green, the ALPR system is ready.
You can take this time to aim the cameras as needed. Afterwards, minimize the window.
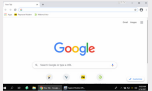
STEP 7
Open a new Google Chrome window. There are bookmarks for each piece of equipment that can be accessed via a webpage.
Click the “Pepwave Modem” bookmark.
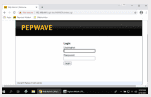
STEP 8
You will be prompted to log in to the Pepwave.
For security reasons, your Username and Password have been provided to your Agency Administrator. If you need assistance, please contact Vetted Service Tickets or 772-440-3245
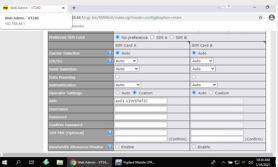
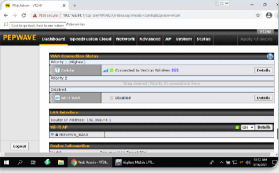
STEP 9
Here we can verify that the SIM card in the Pepwave is functioning correctly.
If the SIM card does not appear to be connected please click the “Details” button (Red) and move to the next step.
If the SIM card does appear to be connected please click the “Advanced” button (Yellow) and skip step 10.
STEP 10
Scroll down until you see the sections for “Operator Settings” and “APN”.
Make sure the “Operator Settings” section is set to “Custom” and the “APN” section has the correct APN inserted. The APN needed can be provided by the SIMs provider.
If changed were made, scroll all the way down and select the “Save & Apply” button.
If these settings are correct but the SIM still is not getting signal, please verify the two cellular antenna ports on the Pepwave are connected and contact Vetted Support