Customer Success Guide
Trailer Delivery Guide Overview #
Congratulations on the purchase of your new Vetted ALPR Speed/Message Trailer. This timeline provides general guidance and understanding of the delivery process for your new trailer.
Confirmation email of Order #
Vetted: Vetted Production Team will send an email confirming the Purchase Order (PO) and order details. This will include trailer part number, quantity, color, and delivery instructions.
Customer: Review Order Details and verify both order & delivery instructions are accurate.
Please Note: A loading dock is required for unloading the trailer, if trailer is small enough unloading by forklift is possible.
Please Note: On some occasions, third parties outside of Vetted Security Solutions will be required to unload in the event a loading dock is not present. Coordination between 3rd party organizations required for unloading is the responsibility of the customer.
Customer SIM card and/or Config File: #
Vetted: Email from the production team will provide the device IMEI and give the option to mail a static SIM card from the end-user during the build process. Production will also ask for confirmation of other agency account details to which the new trailer is being attached. Production will also request the agency LEARN Config file for the trailer prior to shipping.
Customer: Provide SIM Card to production during the standard production cycle. Provide CDMS or CDFS (whichever is applicable) config file during the standard production cycle.
Please Note: We stock AT&T FirstNet SIMs. For customers wanting a FirstNet SIM, we need an authorized FirstNet point of contact (POC) on the agency account and can then provide SIM/activation on the agency account at an additional fee.
Coordination of Trailer Delivery #
Vetted: Once order details are confirmed, the delivery date will be coordinated. The Vetted Production Manager will transmit delivery instructions.
Customer: Provide POC for coordination of delivery. Please ensure our team has at least one primary and one alternate POC.
Accepting Trailer Delivery #
Vetted: Provide Driver ETA & Contact information to RSM, CSM, and End User POC. Vetted will send an email to confirm the shipping POC, address, and the customer’s ability to receive trailers at their location on specified days.
Please Note: Customer will require a loading dock for unloading. If a loading dock is unavailable, the customer will need to coordinate a wrecker or similar unload methods to remove the trailer from the flatbed.
Inspect Trailer and Sign Bill of Lading #
Customer: Once the trailer has been delivered, visually inspect all components prior and during the unloading process to verify no damage was incurred during shipping.
Please Note: Any damage noticed, please note the Bill of Lading (BOL) or Delivery Form. For any serious damage, immediately contact the Vetted team before signing BOL paperwork for additional instructions.
Install and Validate Cameras #
Customer: After delivery, and physical inspection of the trailer delivery there are a few things you will need to do to get your trailer operational.
- Install LPR Cameras on the trailer via provided cables and mounts. You will find the cameras in the battery box located at the rear of the trailer. Please refer to the attached Receiving Your ALPR Trailer & Trailer Setup/ Deployment Quick Start Guide if you need assistance installing the cameras.
- Install hitch into trailer and connect the brake lights. Please refer to the attached Receiving Your ALPR Trailer & Trailer Setup/ Deployment Quick Start Guide if you need assistance properly installing the hitch and brake light connectors.
- Verify all electronics components power up. Your VLT is located at the front of the trailer with the Vetted logo on it.
- Take the Certificate of Original Manufacturing Origin to your DOT office and apply for a tag through your local state DOT. If you do not have a
- Certificate of Origin (COO), please contact Vetted staff.
- Add the trailer to your insurance policy; depending on local state DOT laws this may be required before applying for a tag.
- Have upfitter attach any logos and phone numbers to the trailer, return to the station, and plug trailers in with power turned off.
For further instructions, please see the attached Receiving Your ALPR Trailer & Trailer Setup / Deployment Quick Start guide for a comprehensive guide.
Implementation Team Members #
This section outlines the various teams that will support you through your order, build, and delivery process. You may contact your sales rep or the corresponding Vetted team at any time.
Production Team #
Vetted’s Production Team is your initial POC who will be guiding the process from the time a Purchase Order (PO) is received through the delivery of your trailer. The Production Team responsibilities include:
- Confirmation of Order Details
- Providing Router IMEI information and shipping instructions for SIM card
- Confirming Trailer Delivery Location
- Coordinating Trailer Delivery Instructions
- Receiving signed Bill of Lading from customer
- Sending Certificate of Origin once trailer is invoiced
Vetted Security Solutions Support #
The Vetted Security Solutions Support team is committed to answering all your day-to-day questions as quickly as possible. Please see the steps below for the support process:
- Go to https://vettedsecuritysolutions.com/support/
- Click on the “Support Ticket” Icon
- Choose from the following options: LPR Technical Support, License Key Request, Account Management, CCTV and Surveillance, Thermal Camera Support, or Other Questions.
- When opening a support ticket, if you have multiple physical sites and or equipment impacted, please create an individual ticket for each. Do not bundle multiple different physical sites/equipment in the same support ticket.
- Please provide the following information: Your Name (Contact Name), Phone Number, Email, Company/Department, a summary, and a detailed description of the issue you are having. Attachments are optional.
- Press send to notify our help desk, and a confirmation email will be sent to the email address that you have provided.
- Once the ticket is updated/ or closed, it will send you an email notifying you that the support request has been modified/ or completed.
For issues requiring immediate technical support, please call the Vetted Security Solutions office number at (727) 440-3245 Ext 1.
Receiving Your ALPR Trailer #
This section contains key information to prepare for the delivery of your new trailer.
- Trailers are delivered on a semi-truck and will require a loading dock or customer contracted tow truck for unload.
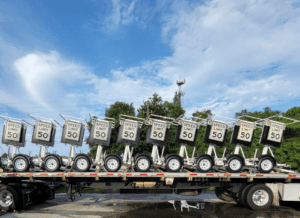
- On initial delivery please inspect all trailers for any damage incurred during transit.
- Note any minor damage and/or scratching on Bill of Lading (BOL). For any major damage, immediately call the Vetted Support line and/or your Production Manager prior to accepting delivery.
- Prior to initial deployment please ensure the trailer is titled and registered by taking the provided Certificate of Origin (COO) to your local DOT.
- Please contact your fleet department to ensure trailer is added to standard insurance policy for agency.
- The customer is responsible for the tag and insurance of the trailer.
Customer Responsibilities #
This section covers customer responsibilities prior to and post-delivery of the new trailer system. Please follow the steps below to install the trailer hitch and connect the cameras. Once complete and tested you can follow the steps to schedule training.
Trailer Hitch Installation #
Once the trailer has been unloaded, and administrative paperwork handled for registration and insurance, it is time to begin getting your trailer ready for initial deployment.
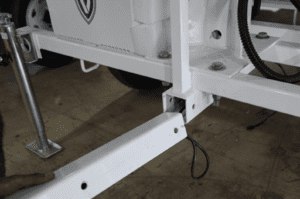
The trailer is shipped without the hitch attached. A trailer hitch will need to be installed on the trailer body after unloading.
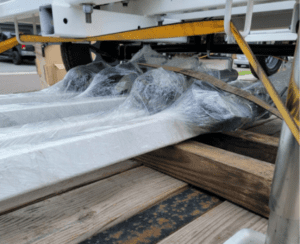
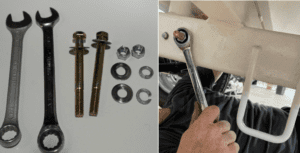
- Tools needed to install the hitch properly.
– (2) – ¾ inch wrenches for each side
– Bolts/Washers/Nuts that come with the Trailer Tongue
Installation Steps #
- While balancing the trailer hitch at female entry point, ensure you have male / female connector firmly attached.

- Slide the male end of the trailer hitch into female receiver and insert locking bolts.

- After securing locking bolts with the ¾ wrenches through the hitch, connect the brake light connector found in the tongue to the connector located at the back of the trailer.

- Verify lights work on trailer.
- Tow a short distance in controlled setting to ensure hitch is properly attached.
- After a short tow and verification of all lights functioning properly, tighten the hitch bolts underneath trailer a final time.
Adding Your Cameras to the Trailer #
For protection during shipping, the cameras are bubble wrapped and placed in the battery box or storage compartment on your trailer. The cameras will need to be installed on the RAM ball mounts with pre-run cables upon delivery.
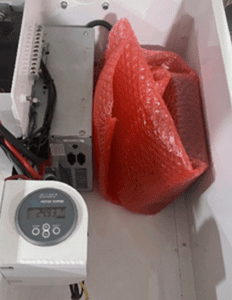
Installation Steps #
- Carefully unwrap and confirm camera and all mounting hardware are present.
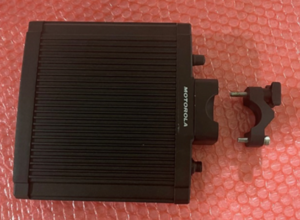
- Attach camera to RAM Ball mount located on your trailer.
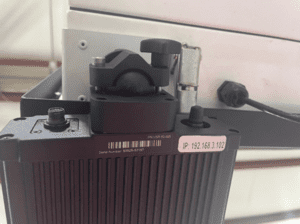
- Find the camera cable end and line up the arrow with the top of camera.
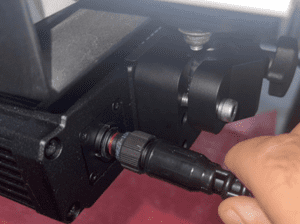
- Tighten this Bezel until securely fashioned.
- Replace dust cover over camera end piece.
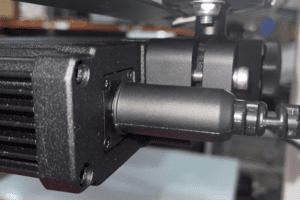
NOTE: Installation should be plug and play after the camera is installed. After installation, please look for a visible red light on the front of the camera to ensure the camera is powered on.
Electrical Charge Requirements & Run Time Expectation #
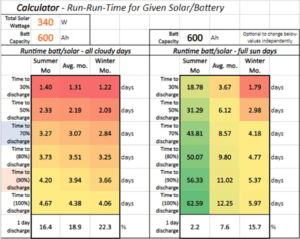
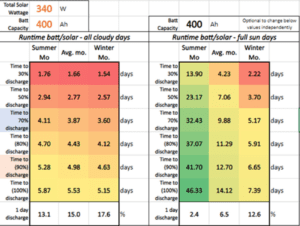
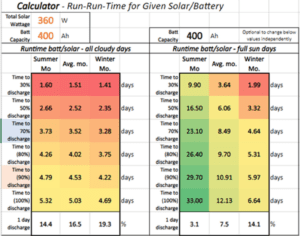
All trailers are powered by Solar Assistance and will have different run times based on trailer model, time of year, and area of the country being deployed to. A run time estimate can be provided upon request for each trailer type based off geographical zip code.
Sample Run time calculations are shown below: #
*For all AGM use 70% discharge number. For all LiPo4 use 90% discharge number*
Example Custom Trailer Run Time in New York State:
Example Long Run Speed Trailer Run Time in New York State:
Example Standard Message Trailer Run Time in New York State:
Example Standard XL Message Trailer Run Time in New York State:

- Trailers have 4 stage managed battery chargers included in each trailer. The trailer will go through a warmup/conditioning phase, full charge, cooldown, and then trickle charge.
- All batteries are considered maintenance items and only a limited hardware manufacture warranty is included.
- A best practice is to regularly cycle batteries and allow them to go through a
discharge/charge cycle. - All trailers sold with AGM batteries have a life expectancy of 2-3 years based on average usage. It is possible to upgrade to Lipo4 batteries. The life expectancy increase on LiPo4 is to 5-7 years with average use and battery maintenance.
- For connecting trailers to shore power, use a standard 120VAC extension cable and attach to marine grade connector located on front of trailer battery box.
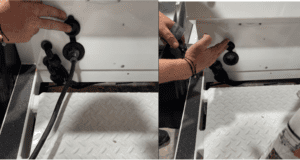
- Ensure only 1 trailer is plugged into each outdoor plug location. Trailer charger pulls nearly 15amp at full load.
- Please Note – Attaching two trailers to a single outdoor plug will trip the breaker and prevent trailer from charging. Do not use power strips or lightweight extension cords and check the system periodically to ensure it is properly charging.
Trailer FAQs #
What voltage is my trailer?
Vetted trailers come in two configurations – 12V and 24V DC. All trailers plug into standard 120VAC plug for charging and are solar assisted to extend battery run time.
How much power does this consume?
Peak current draw is 4A at 24V Configurations and 6A at 12V Configurations. AC Battery charger will not exceed 15A at 120VAC.
What is the battery life expectancy for my trailer?
This can vary greatly be based on battery maintenance. Examples of this would be allowing to run through proper cycles, not leaving batteries in dead conditions for extended periods of time, occasional connection to AC power for high amp charging. Typical life expectancy with proper maintenance is between 2-3 years on AGM and 5-7 years on LiPo4. Batteries will continue operation but run time may be severely impacted past that time.
My trailer is not running for the expected amount of time, what are the remedies?
All trailers have detailed logs showing run time and charging history over time. Please first verify the unit has been charged by plugging into power and checking for voltage displayed on voltmeter to rise. If the trailer is plugged in and this does not occur, please contact Vetted Support. Please have trailer powered on and remote login information readily available.
Support Process #
Another option for support is to create a service ticket through our website. Those steps are outlined below:
- Go to https://vettedsecuritysolutions.com/support
- Choose tech support
- Choose technical support
- Provide a summary and description of the issue you are having, and we will have a record of the ticket in our system.
- Once the ticket is closed it will send you an email notifying you that what has been done.
For additional technical support, call the Vetted Security Solutions at (727) 440-3245 and then dial 1. This will take you directly to our Service desk.
Remote Support Tool #
Some support calls require further analysis of the client’s database, process or setup to diagnose a problem or to assist with a question. Vetted Security Solutions will, at its discretion, use an industry-standard remote support tool. Support can quickly connect to the client’s desktop and view the site’s setup, diagnose problems, or assist with screen navigation. More information about the remote support tool that Vetted Security Solutions uses is available upon request.
Please visit https://vettedsecuritysolutions.com/support/ for support or visit
https://vettedsecuritysolutions.com/contact/ for inquiries on adding TechAlert to your agency’s support procedures.
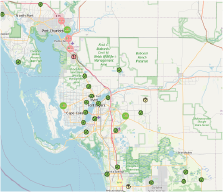
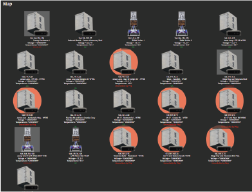
TechAlert is an optional add-on that allows agency managers and power users to view all deployed equipment, receive alerts, have automated corrective actions taken in event of field level issues, and a host of other customizable features. A screenshot of the map interface and dashboard overview is included below:
